S’MORE PLEASE?

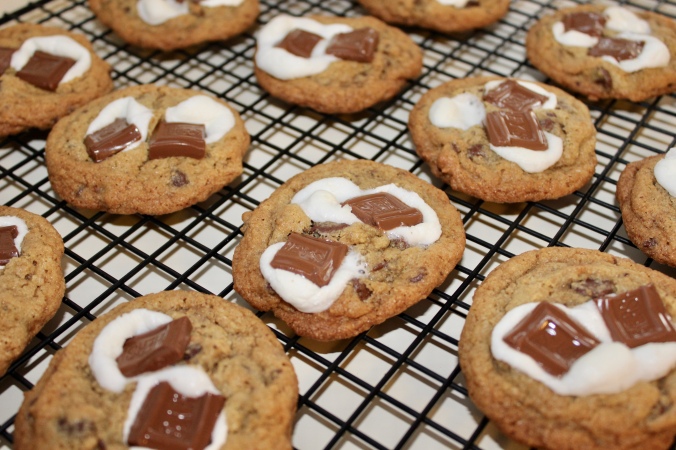
SHUT THE FRONT DOOR – Yes, this is another smore cookie recipe in the same week and it’s OUT OF THIS WORLD! So I’m not even ashamed! These cookies were a big hit with my family and I hope you love them too! I ate three before I even finished making the whole batch – oops!

Ingredients

  • 3/4 cup softened butter
  • 1/2 cup white sugar
  • 1/2 cup packed brown sugar
  • 1 egg, room temperature
  • 1 tsp vanilla extract
  • 1 1/4 all purpose flour
  • 1 cup graham cracker crumbs
  • 1/4 tsp salt
  • 1/2 tsp baking soda
  • 3/4 cup semi sweet chocolate chips
  • 3 Hershey bars – broken into bits
  • mini marshmallows
  1. Mix together butter and sugars. Add egg and vanilla.
  2. Add flour, baking soda, salt and graham cracker crumbs.
  3. Add chocolate chips
  4. Using a cookie scoop place on tray (about 9 per tray)
  5. Bake at 375 degrees for 10 minutes
  6. Remove from oven and add marshmallows (I added 3 to each cookie)
  7. Cook for 3 minutes
  8. Remove from oven and add Hershey bits. (I put 2 bits on each cookie)
  9. Let cool on tray for 5 minutes before moving to cooling rack

AHHH-Mazing!!

fullsizeoutput_64c5.jpeg

Find the original recipe here!

Now a little something for the mommas out there! Every mom likes to feel pretty and my weakness is always mascara even if I don’t have time for anything else. I’m going to share my absolute favorite!

I’ve tried out many mascaras but these two are my favorite so far! I put a coat of Urban Decay Perversion and put a coat of Benefit Roller Lash on top. I love the results I get from these mascara’s together. They apply easily and smooth. I don’t have a problem with clumping and it also removes easily. I hate when you fall asleep with mascara on and you wake up with eyelashes that are a sticky mess – I’ve never had it happen with these 2!

Anyone else use these mascara’s? What’s your favorite – let me know why I need to try it!

Soup with a side of chocolate, please!

I am excited to share this post because it’s always exciting to share your favorite recipes! One of my favorite things to make and eat in the winter is soup! This Ham & Potato soup is at the top of my list as well as my husband and kids! I love kid friendly meals 🙂 It is so so good and easy! I did change a few things but there will be a link to the original recipe under the picture!

Ingredients 

  • 3 cups peeled & diced potatoes
  • 4 celery stalks
  • 1/3 cup finely chopped carrots
  • 1/3 cup finely chopped onion
  • 1 cup cooked ham (I used a ham steak and brown it first)
  • 32 oz chicken or vegetable broth
  • 5 tablespoons of butter
  • 5 tablespoons of all-purpose flour
  • 2 cups milk
  • Salt & pepper
  1. Add diced potatoes, celery, carrots, onion, and ham to a stock pot with chicken broth. Bring to a boil and let cook until potatoes are tender. About 15 minutes.
  2. In a sauce pan melt the butter and add the flour. Stir constantly until it thickens. Slowly add in milk and continue to stir until it is mixed together and thickened.
  3. Stir milk mixture into the soup and add salt and pepper to taste. Let cook  a few minutes to let flavors come together.

fullsizeoutput_6492


Original Ham & Potato Soup

Let me know if you try it! It’s one of my favorite recipes!

After dinner my daughter wanted to make dessert. Who can say no to chocolate? So I let her get to work!

fullsizeoutput_6494

I’m not too fond of the chocolate pen as it seems to never work right! The chocolate melts in a bowl of hot water which is usually quick and easy but the pen never works right! I could spend 20 minutes trying to set the chocolate up right with the tools and to get it to work right with the pen. It’s just a waste of time in my opinion! The stuff inside the pen is sometimes too loose to even push the chocolate out.

Sooo she ended up melting the chocolate, cutting the bags open and using a baby spoon to fill them into the chocolate trays.

In the end we ended up with yummy chocolate! The chocolate in the pouches actually tastes pretty good but the pen is not worth the time to try and use.

fullsizeoutput_6495

Product Review: Betty Crocker Hello Kitty Cookies

My daughter loves cats! When my mom saw these Hello Kitty cookies she knew she had to get them for her. We had another snow day today so we spent some time making these cute little cookies!

fullsizeoutput_6484

The mix is super simple! You only need 1/3 cup vegetable oil, 1 tablespoon of water and 1 egg. Once you mix it all together the dough turns a pretty pink!

fullsizeoutput_6485

It was easy enough my 5 year old was almost able to do it all on her own.

img_4747

Once the balls are rolled out you have to flatten them and then stick these cute little hello kitty edible paper on.

fullsizeoutput_6488

Overall the cookies were pretty good. The paper was a little weird on top of the cookie. It wasn’t that it had a bad taste because it had no taste. It just was a weird texture mixture with the cookie. After my first one the texture issue didn’t bother me as much with the second. My kids ended up peeling the kitty off and eating the cookie.

This was a cute, inexpensive mix and my daughter was super proud for making them on her own!

Cookies, Science, and a baby in the sink!

Let’s start off by saying I made some awesome cookies tonight! It’s the end of January in  Ohio. We have a couple of inches of snow on the ground and it’s freezing. Oh, how I long for those long summer nights sitting around the fire toasting marshmallows and making smores!

I knew I had to do something to kick the winter blues so I found a recipe for smores cookies on Pinterest. You must try these if you love smores! I didn’t roll my cookies in graham crackers but I did mix the crumbs in and I broiled the marshmallows for about a minute and a half! I also raised the temp to broil and back down while doing each tray and I didn’t feel like it took too long.

Link to original recipe here!

Today was a snow day for the kiddos here so we got a little science lesson at home. This experiment is also one I have seen on pinterest. It’s a nice activity to show kids how the roots of plants absorb water and bring it up the plant.


This experiment is really simple and you probably already have everything you need to do it!

Materials needed:

  • 3 clear glasses
  • paper towels
  • food coloring

Simply fill 2 glasses with water and then add a generous amount of food color to each glass ( I used blue and green). The third glass will be empty and sit in between the two glasses. Take the paper towel and fold it so one end is in the water and the other in the empty cup. Do the same to the second cup. After about 30 minutes the water/food coloring mix will start to climb up the paper towel. One hour later it will have climbed all the way up and there will be water in the third (empty) cup! This was pretty fun for the kids to watch!

Lastly, you know it’s been a long day when you walk into the bathroom and find a baby in the sink.

babydoll

My daughter loves to watch baby alive videos on Youtube. This is her set up when she is getting ready to feed her baby. She takes washable markers and colors on a small scrap of paper and sets it in water to make colored baby food. While she loves doing this…she often leaves behind a mess as pictured above. Luckily she now feeds her doll in the sink or on her doll potty chair to help save on the mess 🙂

White Pasta with Ham & Peas

I just love pasta! White sauce, red sauce, buttered… it’s all YUM to me! However, my husband isn’t a big red sauce pasta fan. So I am always trying new recipes to fit the needs of a picky husband + picky kids! This recipe is quick and easy and one thing I can count on them all eating!

White Pasta with Ham & Peas

Ingredients 

  • 1 pound of bow tie pasta
  • 1 ham steak
  • 1 cup of frozen peas
  • Kosher salt
  • Freshly ground pepper
  • 1 cup heavy cream
  • Freshly grated Parmesan
  • Parsley

Cook the pasta according to package. Meanwhile, warm ham steak through in a skillet and then cut up into bite size pieces. Return ham to skillet along with 1 cup of frozen peas and 1 cup of heavy cream. Bring skillet to a simmer and stir occasionally until sauce thickens. Mix pasta into skillet and toss to cover in sauce. Salt and pepper to taste and garnish with parsley and parmesan cheese. img_4727img_4728img_4733